Pages

Monday, February 19, 2018

Bringing It All Together

After months of planning, experimenting, and exploration, we are finally ready to put all of our hard together into a final project. Last week we began work with our 6th-grade students to bring their laser cut project boards to life with the help of Bare Conductive Touch Boards.

We started the process by introducing our students to the touch boards, giving them time to look through the kits while we explained our vision for the final product. Next, we planned out where we would connect the boards using conductive paint. Each student traced their touch board on a central space within their design and penciled lines from each connection to the area they would like to highlight. This was helpful because they were able to notice areas where the lines overlapped and fix their work in pencil before the conductive paint was laid.

We decided to start small with 5 different touch points for each board. The boards allow for 12 but that is a large amount and we didn't want to overwhelm our students. With 5 connections we had the ability to skip sensors on the board so every other will be connected. We figured this might give us a little bit of wiggle room and make using the conductive paint less of a challenge. 

Included in each starter kit, along with the touch boards, was a set of stencils. We used the stencils paint connecting points to each sensor. Since we decided to try to connect the Touch Boards on the back, we set them aside to dry before tackling the paint on the front.


While the paint dried we got to work on creating sound clips. Our students have Chromebooks and have had experience using Voice Recorder Online. It isn't fancy but for our needs, it worked perfectly.


The hour we had with our students flew by! By the end of our work session, we were finally able to see their final projects taking shape. We are looking forward to getting the Touch Boards programmed and everything in place over the next month. Stay Tuned!

Sunday, February 11, 2018

Printmaking meets Technology


One of my personal goals during the Ignite a Maker program, is to create a sketch, upload it to illustrator and figure out how to raster engrave it into a piece of wood, ultimately creating a wood cut print for printmaking. That is just what I started to do last weekend. Carrie and I went to the Generator, and after discussing it with Caty and the volunteer at the front desk, we easily used the laser cutter to engrave my sketch into first cardboard, then wood. Instead of using color mapping, we simply used layers on illustrator and sent it to the laser cutter twice (hiding layers that we didn't need). We couldn't believe how quickly and effortlessly the whole process was. Forget color mapping. Layering is the way to go!

We ran out of time, but we know for next time you can engrave the image multiple times for a deeper and deeper cut without it getting smokey. 

Now that I know how to make my own block prints, stay tuned for some new prints. Printmaking meets Technology! 


Thursday, January 18, 2018

Have You Checked These Three Things?

Laser cutting is never as simple as hitting the print button. After spending hours creating a design and preparing it to cut, it can be frustrating when a cut doesn't work out as planned. Last week Jenny and I spent some time cutting boards for our 6th-grade students' passion projects. We started with what we thought would be our easiest project but were soon scratching our heads, unable to get it cut.

Lucky for us, Brian, our studio neighbor, was available and able to troubleshoot with us. There are many variables in laser cutting but Brian suggested checking these three things first:

1) Is the line size correct?
2) Has vector or raster been checked in the print setup screen?
3) If using color mapping, has the button which saves the information been hit?

This simple but effective list of questions fixed our issue and got us back on track. Thank you, Brian!

This board is cut!
Next step- A Bare Conductive Touch Board will be coded
and added to create an interactive experience.

Saturday, December 30, 2017

'Tis the Season...for Laser Cutting!

Inspired by the holidays I designed and created ornaments using Adobe Illustrator and the laser cutter.

This was the first project I created on my own!

Throughout the creation of these ornaments, I learned many things about the design process and the various ways in which it is possible to cut projects out with the laser. I received help from several people who each had a unique way of creating their files and preparing them to cut. Some prefer to use color mapping, a process which uses colors to tell the machine to cut or engrave using different settings in the same job. Others use the layer feature on Illustrator to engrave a layer on one job and then cut a layer on a second job. It was interesting to see how the techniques used varied by the individual.
Printing preferences menu showing the settings for a cut using coloring mapping.

While I was happy with my final products, each of the batches of ornaments I created was slightly different. I played around with the speed, power, and frequency settings on the print menu while working but I wasn't sure which factors were causing changes in my work.

This week Jenny, our colleague, Christine, and I played around with the speed setting by doing a few test cuts. We started out with a lower speed of 10. While the flames were minimal and the print came out clear, it looked a little charred (see the letter M below). We tried again with the letter C increasing the speed to 20. The result was similar. The final time we cranked up the speed to 60 and while the lettering wasn't as dark, it also didn't look burnt. Success!
Test cuts with different speeds. The S was engraved using the highest speed.
One thing is for sure, three hours on the laser printer flies by!


Connecting Educators with The Generator.


Yesterday, Carrie and I invited three local educators to join us at the Generator. We introduced them to the space and shared our current projects with them. We also connected them with other Generator members. 
Christine DePatie, 6th Grade Educator from Swanton Central School, discussing flute making and STEAM education with Brian Merrill.
Carrie and Christine problem solving an issue with the laser cutter. Check out Carrie's upcoming blogpost on Speed!


From Back to Front, Lisa Bresler (K-5 Art Educator, Shelburne Community School), Christine DePatie (6th Grade & STEM Educator, Swanton Central School), Carrie Speranza (Librarian at Swanton School), and Me (Jenny Jacobson, Art Educator K-6, Swanton School). Not in Photo, Evelyn Stenroos (6th Grade Educator, Colchester Middle School).

Wednesday, December 13, 2017

A Little Help from our Friends: Laser Cutting at the Generator

Last week, Carrie and I committed a few hours to using the laser cutter at the Generator. We both had taken the certification class and had some experience using one before, however we had never operated one alone!

After referencing our notes, I uploaded my design and we were ready to go! Right away, I had a couple of design flaws. I sought out the help of one of the only people at the Generator in the morning, Brian Merrill. He is a Generator member and creates incredible laser cut/hand cut flutes! Brian stopped everything and spent over an hour with us. Thanks to him, by the end we were using the laser cutter more confidently and "perfected" our cuts!

Laser Cutter at the Generator

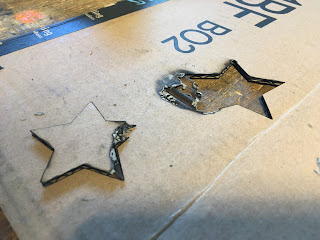
Reusing the pieces we cut out! Art Stars!

Test Cut with Cardboard caught on fire.

We decided to test the second cut on board. No fire this time!

The Final Product! One of our sixth grade student's passion project on the "life cycle of a star". She used inkscape to create her design. I uploaded to illustrator and cut it out for her. Next step, she'll create a circuit and let her stars shine away!  

Sunday, December 3, 2017

Creating Vinyl Stickers with the Silhouette Cameo

During our prep period, Carrie and I decided to dive into the Silhouette Cameo. Just like the Touch Board, we instantly found some complications. Carrie created circle patterns to cut out for an upcoming project. At first only half of the circles on the vinyl sheet cut out. After some tinkering (and help from Google), we realized that we had to manually adjust the blade. Easy fix. After that, it consistently cut out the circles. Though the stickers are hard to remove!

Overall, we found the machine relatively easy to use and more importantly useful. We ordered cutting fabric for one of our sixth grade projects and excited to try out a new material.

Check out some of our photos from this tinkering session. We were joined by some thirds graders who were learning besides us! The best type of learning!